
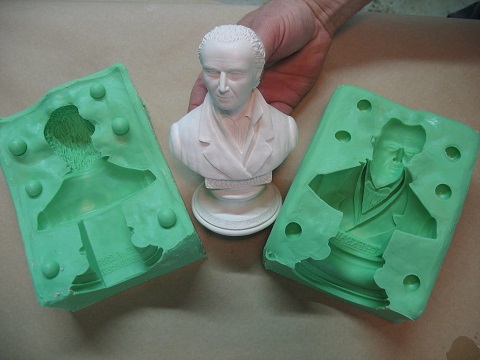
Two Piece Silicone Mold of Small Bust

Figure 1
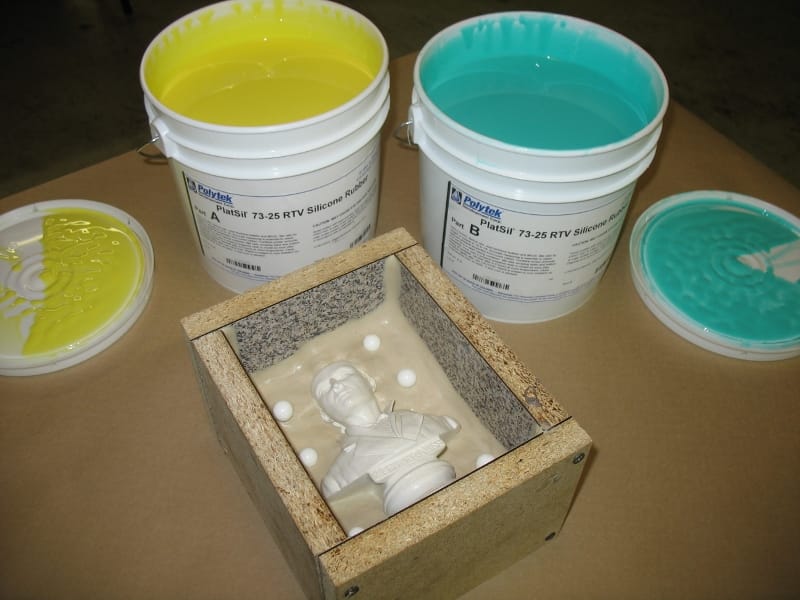
Mold Material: PlatSil® 73-25 Silicone Rubber
About this Rubber:
- Platinum Silicone Rubber
- Mix Ratio: 1A:1B
- Shore Hardness: A25
- Pour Time: 15 minutes
- Demold Time: 4-5 hours (at room temperature)
Supplies Needed for Project:
- A Model (this tutorial uses a small resin bust [Figure 2])
- PlatSil® 73-25 Silicone Rubber (Part A & Part B)
- Materials for a mold box (e.g., melamine-laminated particle board, screws, screw gun)
- Plasticine Clay
- Mold Keys (e.g., marbles)
- Pol-Ease® 2500 Release Agent and brush
STEP ONE: Prepare the Model
Because this is a non-porous model, a sealing agent does not need to be applied. A release agent is also not necessary because platinum silicone rubber releases well from the model material (a release agent would need to be applied if a polyurethane rubber was used as the mold material).
IMPORTANT NOTE: Platinum silicones can suffer from cure inhibition when poured over certain model materials. If you have questions about compatibility, refer to our “Sealer & Release Agent Matrix” or contact us. It is important to perform a small test cure in an inconspicuous location on the model to test compatibility.

Figure 2
STEP TWO: Construct Mold Box
This mold box is made from melamine-laminated particle board [Figure 3]. The sides are secured together with screws. A variety of other materials can be used to construct the mold box, including: Plexiglas®, PVC pipe, acrylic, plywood, and UHMW polypropylene.
The design of the mold box should provide at least 1/2″ of space on all sides of the bust except for the side that will accommodate the pour hole. The pour hole is where casting material will eventually be poured when the mold is finished (the figure will actually touch the mold box wall on this side- in this case, the base of the bust will accommodate the pour hole).
Also ensure that the mold box is tall enough to provide at least 1/2″ of space above the resin bust.
STEP THREE: Embed Half of the Model in Clay
Embed half of the model in plasticine clay. Use an oil-based, sulfur-free clay when working with silicone rubbers (sulfur-based products can cause cure inhibition in silicone rubbers).
Parting lines are defined in this step (i.e., where the two pieces of the block mold divide). It is best to avoid locating parting lines on obvious parts of the model (e.g., the face).
The base of the model is positioned flat against the mold box wall [Figure 3] – this will provide a pour hole for casting material when the mold is complete.
Also apply clay to the interior corners of the mold box where the sides of the mold box meet; this will help prevent rubber from leaking out of the mold box.
STEP FOUR: Add “Mold Keys”
Mold keys create tongue-and-groove impressions designed to align the two sides of the mold once cured. Marbles or other objects (e.g., cured pieces or rubber, hardware) can be used for this step. Indentations in the clay will also work.

Figure 3
STEP FIVE: Determine How Much Rubber is Needed
At this point, only mix the amount of rubber necessary for the first part of the mold. To determine how much rubber is necessary:
-
Determine the volume of the space in the mold box that is above the clay and at least 1/2″ above the model (L” x W” x H”).
-
Then subtract the estimated volume of the part of the resin model that is exposed.
-
Take this result and divide by the specific volume of the rubber being used (PlatSil® 73-25 has a specific volume of 24.3 cubic inches/lb).
-
The result will be the amount of rubber (lb) necessary to complete the project.
Follow the same calculation when determining the amount of rubber necessary for the second part of the mold.
STEP SIX: Thoroughly Mix Rubber
Ensure that all rubber is at room temperature before mixing.
PlatSil® 73-25 has a mix ratio of 1 Part A : 1 Part B, which can be measured by volume or by weight.

Part A
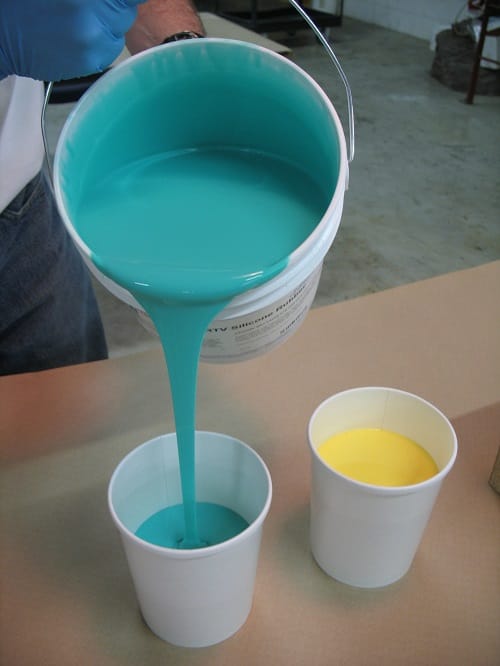
Part B

Combine Part A and Part B in a clean container and mix thoroughly. Scrape the sides and bottom of the container multiple times while mixing.
PlatSil® 73-25 has a pour time (i.e., the amount of time before the rubber begins to gel/harden) of 15 minutes. Ideally, the rubber should be mixed thoroughly and poured over the model in half of the pour time (e.g., 7.5 minutes).
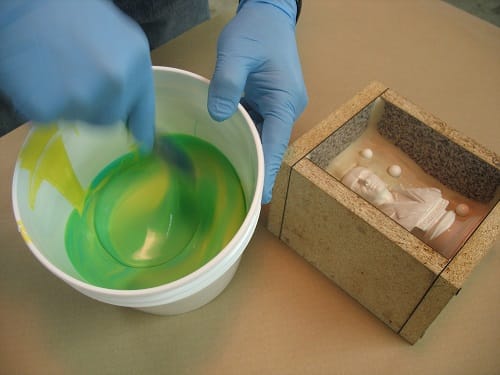

STEP SEVEN: Pour Rubber
Pour rubber into one corner of the mold box. This allows the rubber to flow across the model, pushing the air ahead of it in order to prevent air bubbles.


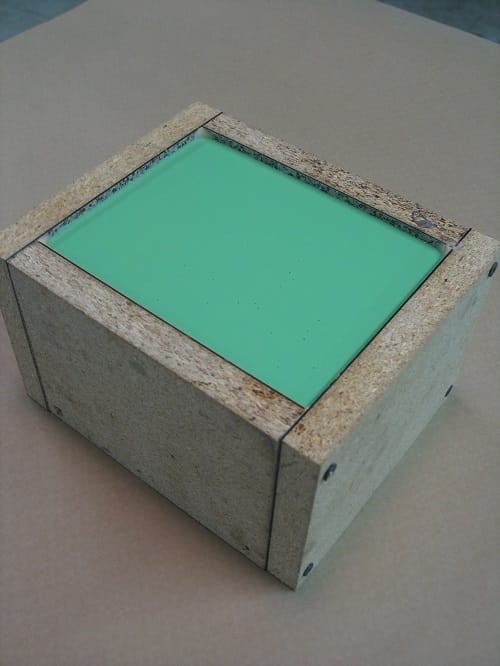
STEP EIGHT: Allow First Half of the Mold to Cure
Allow the rubber to cure, undisturbed, for 4-5 hours before demolding. The rubber can be demolded after 4-5 hours, but final cure properties are not reached for ~48 hours.

STEP NINE: Prepare to Make the Second Half of the Mold
When the rubber has cured, dismantle the mold box and remove the first half of the mold.

Remove marbles and all clay. A tool (e.g., a tongue depressor split in half) may have to be used to remove the clay from the details of the model.

Reassemble the mold box around the first half of mold; keep the model in the same position.

Apply clay to the edges of the first part of the mold as well as the interior corners of the mold box to help prevent rubber from leaking.

STEP TEN: Apply Release Agent
Apply and brush Pol-Ease® 2500 Release Agent onto the first half of the mold. This prevents the two halves of the mold from bonding together.

STEP ELEVEN: Pour Rubber to Create the Second Half of the Mold
Properly measure and mix the second batch of PlatSil® 73-25. Pour the rubber into a corner of the mold box and allow it to flow over the model.


STEP TWELVE: Allow Rubber to Cure
Allow PlatSil® 73-25 to cure, undisturbed, for 4-5 hours before demolding.
THE FINISHED MOLD:
When the rubber has cured, dismantle the mold box, remove the model from the rubber, and clean the clay off of the rubber.

When final cure properties have been reached (~48 hours), the mold is ready for casting!

To cast these polyurethane plastic pieces (above), we secured the mold between two pieces of particle board with heavy-duty rubber bands and poured EasyFlo 60 casting plastic (with color additives) into the pour hole [Figure 4]. The powder all over the pour hole and mold is bronze powder, which was used for a cold cast bronze technique.

Figure 4