
How to Make a Rubber “Glove” or “Sock” Mold
Glove molds, also referred to as sock molds, are one-piece rubber molds that can be turned back on themselves and peeled off. These molds must be thin (~1/8″) and can only be done on bas relief or models with a pyramid shape.
One of the benefits of this mold type is that a cut does not need to be made in the mold, so seam lines in the reproductions are not a concern. Another benefit is that less rubber is needed to make the mold compared to block molds, for instance.
Materials & Supplies Needed for this Project:
- A Model
- PlatSil® 71-11 Silicone Rubber
- PlatThix Liquid Thickener
- PlatSil® 71/73 Part X Accelerator
- Pol-Ease® 2500 Release Agent
- Pol-Ease® 2300 Release Agent (optional)
- PolyPoxy® Quick Stick Adhesive (discontinued)
- PolyFoam F-3 Flexible Casting Foam
- EasyFlo 60 Casting Plastic (used for casting in the mold – not needed for mold making process)
- Baseboard (e.g., melamine-laminated particle board)
- PVC Pipe
- Mixing Containers & Mixing Tools
- Digital Scale
- Tape (e.g., packing or duct tape)
- Paste Wax
The Model
The following plastic model will be used for this project.


Step 1: Prepare the Model
Perform a test cure on the model, if necessary.
The origin of this model is unknown, so a quick test cure is done to ensure that there are not any contaminants on
the model that will inhibit platinum-cured silicone. Fast-setting PlatSil
® 71-10 Silicone Rubber is used
for this test.


The test shows that platinum-cured silicone will cure successfully against the model.

Adhere the model to a stable baseboard.
We use PolyPoxy Quick Stick Adhesive
(
discontinued), a two-part (1A:1B), fast-setting (3-5 minute cure) epoxy adhesive, to secure the model
to a piece of melamine-laminated particle board.


Allow the adhesive to cure and then apply an appropriate release agent.
A silicone mold
will be made in this tutorial, so Pol-Ease 2500 Release Agent is used. For polyurethane molds, use Pol-Ease 2300
Release Agent.

Spray the release agent onto the model and baseboard and then brush out with a dry brush to ensure even
coverage.


Step 2: Measure & Mix the Mold Rubber
Mold rubbers used for making glove molds should be relatively soft with high elongation properties.
For this project, we select PlatSil 71-11 Silicone Rubber. It is a soft (Shore A10), platinum-cured silicone rubber
with high elongation (751%).
PlatSil 71-11 Silicone Rubber: The Basics
- Shore Hardness: A10
- Mix Ratio: 1A:1B
- Pour Time: 20 minutes
- Demold Time (at room temp.): 4 hours
- Color: Blue-Green
- Mixed Viscosity: 6,000 cP
- Specific Volume: 24.7 in³/lb

How Much Rubber is Needed?
A few layers of silicone will be brushed onto the model; to start, only measure and mix the amount of rubber needed for the first layer. The second layer will not be applied until the first layer has gelled.
The ultimate goal is to reach a mold thickness of ~1/8″. For an estimate of how much rubber is needed for the first
layer, determine the surface area of your model and then multiply by 1/16″. Take that result and divide by the
specific volume of the mold rubber (PlatSil 71-11 has a specific volume of 24.7 in³/lb). This number will give you
an estimate of the amount of rubber (lb) needed for the first layer. It is a good idea to use a bit more rubber than
estimated as some of the rubber may run off of the model. A flange should also be created at the base of model, so
additional rubber is needed for that.
Accessories
Ensure that all needed accessories are ready to go before starting the mixing process.
PlatSil 71-11 is a low-viscosity silicone, so it must be thickened for brush-on application. This silicone can be thickened with either PlatThix Liquid Thickener, TinThix Liquid Thickener or Fumed Silica.
We select PlatThix as the thickener for this project.

We would also like to speed up the cure time of the rubber, so we make sure to have PlatSil 71/73 Part
X Accelerator on hand. Accelerator is not necessary for this project, but adding just 1% Part X decreases the gel
time to ~1/3 the normal gel time.

Weigh Components
When all accessories, mixing containers and mixing tools are ready, use a digital scale to measure out each component.
We recommend weighing Part B into the container first as it is generally lower in viscosity than Part A and less
likely to cling to the sides of the mixing container.

Measure out Part A into the mixing container.

Mix Parts A and B together, scraping the bottom and sides of the mixing container several
times.

Add the thickener and mix thoroughly.
For this silicone rubber, ~3% PlatThix (by weight) of the total mixed weight is a good amount to thicken for brush-on
application. TinThix Thickener is a more concentrated mixture and requires about half the amount of PlatThix
(~1.5%).

Add the accelerator and mix thoroughly. We add 1% Part X. If you prefer to add the accelerator prior to
mixing Parts A and B together, add it to Part B and then combine with Part A.

Step 3: Brush Rubber onto Model
Using a dry brush, brush rubber onto the model working from bottom to top. Working from top to bottom can increase the chances of trapped air. Using short left and right movements while brushing upwards helps to work rubber into the details of the model.


Create a rubber flange around the base of the model.

After a thin layer of rubber has been applied to the entire model, allow the rubber to gel before
moving on to the second layer. Application of the second layer should not disturb/move the first layer.

When the first layer has gelled, measure and mix a second batch of rubber and brush it onto the model.


Allow the second layer to gel and then mix up another batch for the third and final layer. The amount
of layers necessary will vary depending on individual technique.


Allow the final layer to cure.

Step 4: Make a Mold Shell
Thin blanket molds must be backed with a rigid support shell or nest, otherwise they”ll deform during the casting process.
For this project, we choose to make a one-piece flexible foam “nest”.
To begin, trim the flange. We will be using a PVC pipe to cast the foam, we so we trim the flange to the same
diameter as the pipe.

Secure the two halves of the PVC pipe together with tape.


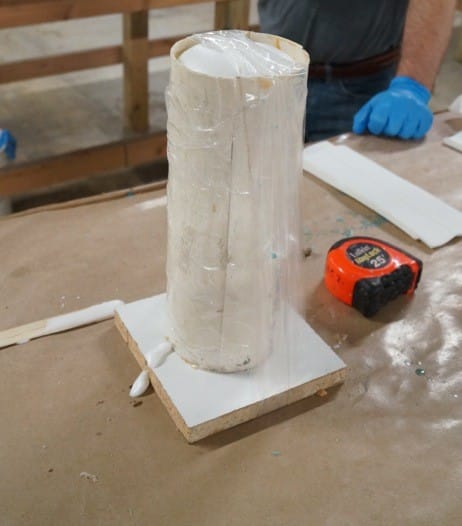
Coat the inside of the pipe with paste wax so it releases easily from the foam. Also lightly coat the
silicone mold with paste wax.


Place the pipe over the mold and secure it to the baseboard with tape.


For a more dense, compact foam, close the top of the pipe with a board and make some vent
holes.
We leave the top of the PVC mostly open.

PolyFoam F-3 is a self-skinning,
flexible polyurethane foam. It has a 1A:2B mix ratio (by weight), a 1.5-minute rise time and a 10-minute demold
time. This foam has a free-rise density of 3 lb/ft³, but should be molded at 5 or 6 lb/ft³ for good results.

To determine how much foam (lb) is needed, multiple the volume (ft³) of the space you’d like to fill by
the desired density of the molded foam (5 lb/ft³).
Carefully measure out Parts A and B (1A:2B), combine and mix thoroughly.


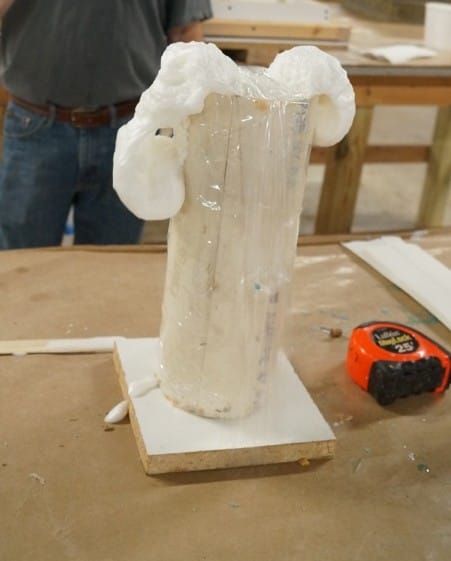
It is important to work quickly when using foam, especially in hot/humid environments. Immediately
after mixing, pour the foam into the PVC pipe.

Because we did not close the PVC pipe, the foam rises out.
Step 5: Demold
When the foam has cured, remove the tape and pipe.


Then remove the mold from the foam nest.


After removing the mold, it is a good idea to squeeze the foam with your hands. This will burst the
cells and allow atmospheric air info the foam to prevent shrinking.

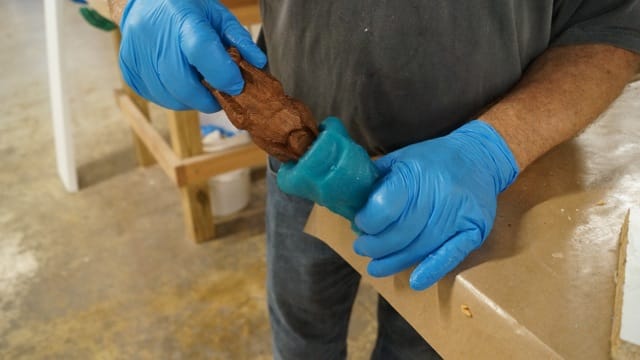
To remove the glove mold from the model, we recommend first applying a silicone release or soapy
water to the exterior of the mold to allow it to slide easily against itself.
We apply Pol-Ease 2300 Release Agent. If you only
have Pol-Ease 2500 Release Agent in stock, it will also work, but a larger amount may be required.


After application of silicone release or soapy water, begin to peel back the mold starting at the
bottom.


It may be helpful to place the mold on the corner of the table for leverage.


Trim the foam nest and make sure that it is level.

To ensure alignment of the mold and foam nest when casting, create a simple notch in the mold and
foam to properly align the two elements each time.


The mold is now ready for casting!

Step 6: Casting
There are many materials that can be cast in silicone molds. Some examples include polyurethane resin, polyester resin, polyurethane foam, epoxy resin, wax, plaster and concrete.
The following example utilizes EasyFlo 60 Liquid Plastic , a fast-setting polyurethane plastic. This plastic has a 1A:1B mix ratio (by volume), 2 to 2.5-minute working time and 15 to 30-minute demold time.
To cast this figurine, we measure and mix the resin and then pour about half of it into the mold.

We tilt the mold back and forth a few times to help release any trapped air bubbles and then
pour the remainder of the EasyFlo 60.

When the EasyFlo 60 has cured, we remove the figurine the same way that the original model was
removed.


The EasyFlo 60 reproduction is pictured below next to the original.


EasyFlo 60 liquid plastic can be dyed with PolyColor
Dyes
or the cured plastic can be painted after-the-fact.
The figurine below was colored with a small amount of Brown PolyColor Dye and then Sculpt Nouveau’s Black Wax was
applied and wiped away with a paper towel to highlight the details of the casting.


